Spawn Mechanics
The following items are, in general, how enemy spawning works in Helldivers 2:
- Each enemy in Helldivers 2 has its own Spawn Mechanic that decides on how it is spawned.
- Your team must stay grouped together in order to lower the scout patrol spawns, or split into 2 teams to minimize the spawns.
- Once half the outposts are destroyed, any additional outposts that are destroyed will increase your heat quickly.
- The primary objective has the biggest impact on spawn rates, so should be kept for last.
Throughout this article each of these statements will be dug into and explained in detail.
Part 1
What types of enemy spawns are there
- Static spawns. These are the enemies placed around Points of Interest, enemy Outposts, and Objectives (both Primary and Sub)
- Reinforcement spawns. These are the enemies that are in Dropships or come out of Bug Breaches
- Fabricator/Nest spawns. These are created from Fabricators/Nests and unless you're detected, it will generally just stand near their parent.
- Patrols. Groups of enemies that patrol the planet. It is the main discussion point of this page.
Patrols
A patrol is a group of enemies that appear somewhere on the map at set intervals and then walk towards another point on the map. Their path will always have them cross very close or even directly on top of a Player's position at the moment the patrol is spawned. These enemies simply appear out of thin air. If you look at a patrol and "Mark" it, your character will actually say, "Enemy Patrol". They are the only enemies on the map that will move around without an external influence. Patrols will despawn if any unit in the Patrol gets 175 meters or more away from the nearest player AND are not actively engaged in combat. NOTE: There is a current bug specific to Automatons where Small (Troopers/Raiders) bots will spawn in and then move towards the exact center of the map and then stand there and never despawn. This is not a patrol and we just want to call them out specifically as a bug.
What are Spawn Points and Tick Rate
Our working theory for how the game determines when to spawn a patrol is the following. The server has a "Tick Rate" which is essentially the frequency at which the server updates the Game's State. For sake of simplicity, we'll just assume that the server has a "Tick" every 1 second although the real Tick Rate is almost certainly much faster. Every "Tick" generates an amount of "Spawn Points" which gets put into a bucket. When this bucket reaches a threshold value, a patrol is spawned and the bucket gets emptied. The amount of Spawn Points generated per Tick and/or the Threshold required to spawn a patrol is affected by various factors which we will detail further down.
Establishing our Baseline
In order to do controlled tests against a single variable, we first need to establish a "Baseline" spawn rate in the absence of any other conditions or activities.
We did this by doing the following:
- Have the "Nuclear Radar" Ship Module
- Equip an armor with the "Scout" perk
- Equip the UAV Booster
- We went into a mission at a particular difficulty while Solo
- Located a spot on the map that was not near any objectives, subobjectives or enemy outposts
- Simply wait while monitoring the map to see when a Patrol is detected and then timing how long it takes for the next Patrol to appear
- Repeat step 3 multiple times and then establish an average from the timings we took
- Once a "Solo" baseline was established we repeated this process for 2 players and 3 players (we didn't have a 4th available for testing) at that same difficulty
This process was then repeated at different difficulty levels and on both War Fronts (Automatons/Terminids)
The following table details the Baselines (in seconds) for a Solo player.
| Difficulty | War Front | Baseline | War Front | Baseline |
|---|---|---|---|---|
| 1 | Automaton | 192 | Terminid | Unable due to TCS missions |
| 2 | Automaton | 255 | Terminid | Unable due to TCS missions |
| 3 | Automaton | 255 | Terminid | 174 |
| 4 | Automaton | 245 | Terminid | 174 |
| 5 | Automaton | 215 | Terminid | 155 |
| 6 | Automaton | 200 | Terminid | 136 |
| 7 | Automaton | 180 | Terminid | 125 |
| 8 | Automaton | 160 | Terminid | 113 |
| 9 | Automaton | 110 | Terminid | 99 |
Additional players modify these baselines in the following way
- 2 Players - Multiply the Baseline by 0.8333
- 3 Players - Multiply the Baseline by 0.75
Unfortunately we did not have a 4th player available for testing so cannot comment on the modifier for 4 players.
Due to the ease of controlling the conditions, we did most of our testing in Level 4 Automaton missions but we have confirmed that all the behaviors function consistently regardless of Difficulty, Number of Players or War Front.
What things affect the Spawn Point generation or Threshold required to spawn a Patrol?
The following activities either increase the Spawn Point Generation or decrease the Threshold, each activity has nuance to it and will be covered in detail in its own section. The end result of almost all of this is that spawns occur MORE frequently than the Baseline. We have not identified ANY action that slows the Spawn Point generation beyond it's "Baseline" with 1 exception which is highly situational and that is having a Bot Drop/Breach very close to the time you would have a patrol spawn.
- Players being in proximity of Primary Objectives, Secondary Objectives, Enemy Outposts and the Extraction point
- Clearing out enemy Outposts (Fabricators/Nests)
- Completing the Primary Objective
- Player Death
These things can stack in a multiplicative fashion and these interactions will be detailed in their own section near the bottom.
The following factors affect the Threshold
- Mission difficulty. Harder missions have lower Threshold
- Number of players in the match. Each additional player reduces the Threshold
- Automatons versus Terminid. Automatons have a higher Threshold than Terminids meaning Terminids spawn patrols more frequently
The following have NO effect
- Time spent in mission
- Engaging in combat
- Stratagem usage
- Breaches/Bot Drops (with one exception that is detailed further down)
- Planet
- Mission Type. All of this data only applies to "Regular" (ICBM, Sabotage Supplies, Purge Hatcheries, etc) missions. We have done no testing against Eradication, Blitz or Civilian Evacuation missions. These mission types are almost impossible to get clean data and aren't really relevant to this anyways.
- Being in proximity of Points of Interest
- Using Terminals or interacting with Objective elements such as turning the radar dish or loading artillery shells
- Completion of Secondary Objectives (with a caveat that is explained further down)
What are Areas of Influence and Heat Generation?
We need to explain a concept that we've termed "Area of Influence". Certain elements in the world create an Area of Influence around them. We have identified the following elements that have this effect and each element has some nuance which will be covered later:
- Primary Objectives (IE The ICBM Silo itself)
- Primary Subobjectives (IE ICBM Launch Codes or Reactivate Power Generator)
- Secondary Objectives - Stratagem Jammers, Crashed Datapods, Illegal Broadcast Towers, etc
- Enemy Outposts (Automaton Outposts/Terminid Nests). Light Outposts do NOT have an Area of Influence. Only Medium and Heavy do.
- Extraction Point
Being within an Area of Influence creates "Heat" and the effect of this Heat is to increase the amount of Spawn Points generated per Tick which means more frequent Patrols.
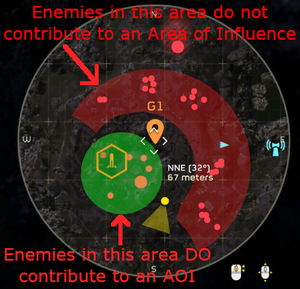
The center of the Area of Influence is the Element's icon on the map. The amount of Heat generated scales based on a Player's distance from that center. Within 50 meters, Heat Generation is at its maximum value and then it has a "Falloff" that extends out to 150 meters and the strength of the Heat Generation decreases by 1% per 1 meter. For example, if you are 100 meters from the Icon, the Heat Generation will be at 50% strength. At 75 meters, it's at 75% strength. At 125 meters, it's at 25% strength.
Here's an infographic demonstrating the concept
The vast majority of things that generate Heat have a maximum effect that increases spawn rates by 50%. There are some situations that increase it another 10% such as certain Secondary Objectives (Detector Tower or Stratagem Jammer for example) or Heavy Outposts.
Areas of Influence do not stack. If you are within overlapping Areas of Influence, only the one with the most Heat Generation applies.
The amount of Heat is calculated every Tick so as you move closer/further from an element producing Heat, the amount of Spawn Points generated per Tick is constantly changing.
For example, using our Baseline of 240 seconds, if you spotted a freshly spawned Patrol while outside any area of Influence and then moved towards the center of an Area of Influence and then stayed there, your next Patrol would spawn between 158 and 240 seconds. If you then stayed within the full strength Area of Influence, you should expect a Patrol after 158 seconds. Finally, if you either left the Area of Influence or stopped its generation, you would again expect the next Patrol between 158 and 240 seconds. Heat Generation can be stopped but the conditions under which this occurs is specific to each of the different types of things that are generating it and will be detailed in a separate section.
What are the effects of clearing out Enemy Outposts?
Enemy Outposts are a distinct type of map element that comes in Light, Medium and Heavy variants. The number of Outposts varies from mission to mission at the same difficulty. Destroying these Outposts will result in a popup message indicating "AREA SECURED" and provide the player with Requisition Slips and Experience. Only Medium and Heavy Outposts produce an Area of Influence and therefore Heat. Light Outposts have no effect or one that is so small that it is negligible. Destroying too many Outposts causes a reduction in the Threshold required to spawn patrols.
You might be thinking, "Destroying a lot of Outposts means MORE enemies?" The only accurate answer is "Sort of" because the destruction of an Enemy Outpost also removes its Area of Influence from the world. This means that the global spawn rate might go up but being in those areas of the map no longer increases your Heat.
Specifics and Numbers on this topic
- Destroying ALL outposts on the map results in the Threshold being multiplied by 0.85. This means patrols spawn ~17.5% faster. Using our Baseline of 240 seconds per patrol, it would become 204 seconds.
- You can safely destroy 50% of the Outposts with no impact. The type (Light, Medium, Heavy) of Outpost does not matter.
- Once you cross 50%, the strength of the impact scales in a linear fashion.
- This Threshold reduction persist for the remainder of the mission
For example, if you spawn into a map with 8 Outposts, you can safely destroy 4 of these with no consequences. When you destroy the 5th outpost, the strength of the Threshold reduction is at 25% or ~4% faster patrols. When you destroy the 6th Outpost, it goes up to 50% strength or ~8% faster patrols.
What are the effects of completing the Primary Objective?
Completion of the Primary Objective has by far the biggest impact on the frequency of Enemy Patrol spawns. As soon as you complete the Primary Objective, the Threshold gets multiplied by 0.275 meaning you are receiving Patrols almost 4 times as often. Using our Baseline value of 240 seconds, this gets reduced all the way to 66 seconds.
What is the effect of being near Objectives?
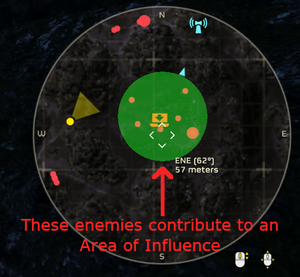
As discussed above, certain elements on the map produce an "Area of Influence" and being inside this generates "Heat" that quickens the spawn rate. The way Primary (Both main and Subobjectives) and Secondary objectives generate their Area of Influence is kind of complicated. If a location has static spawns attached to it and the Objective is in an "Active" state meaning it hasn't been completed, it will generate Heat as long both these conditions are true:
- The static spawns are still alive
- The objective is still active
If either condition isn't met, no Area of Influence exists. The static spawns that are relevant to this are only the ones in the "Main" area for the location and do not include the spawns in outlying structures.
See these Infographics as an example:
If a location does NOT have static spawns attached to it (for example Crashed Datapod or SEAF Artillery), the location generates an Area of Influence until the objective is completed.
However, there exists an exception to these rules and it is best illustrated by the behavior of Detector Towers and Stratagem Jammers (along with other Secondary Objectives).
For Detector Towers and Stratagem Jammers, the main object(s) generating the Area of Influence are the Fabricators in these locations. Once the Fabricator is destroyed most of the Heat generation stops. However, the Detector Tower/Jammer itself ALSO generates an Area of Influence with a small Heat coefficient. While the Fabricators create Heat that increases the Spawn rate by 50%, the Objective structure itself does so with a 10% increase. These effects combine multiplicatively. Essentially, if you're going to attack these objectives, the Fabricators should be your first target.
What is the effect of the Extraction Point?
The Extraction Point is kind of a special location in that it generates an Area of Influence at all times and there is no way to remove it. Even if you drop on the extraction at the start of the match and have done nothing else, you are being affected by its Area of Influence. Actually calling in Pelican-1 has no effect, the increased spawn rate is simply due to being near the Extraction Point. The Extraction Point generates Heat that results in a 50% increase in spawn rate.
What happens when players split up?
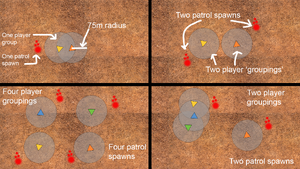
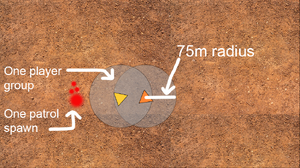
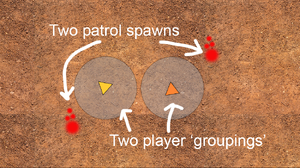
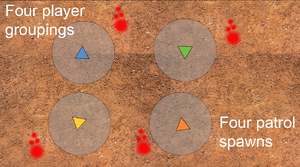
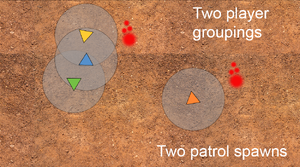
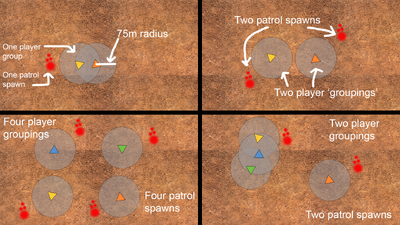
We need to introduce the concept of a "Player Group". A Player Group can be defined as any set of players that are 75 meters or closer to at least one other player. A player by themselves is still considered a "Player Group", just with one member. Each Player Group maintains their own Spawn Point bucket and when that Player Group's bucket is filled, it will spawn a Patrol for that Player Group.
For example, if 4 players were all over 75 meters away from any other player, you have essentially quadrupled the spawn rate because every Player Group is spawning their own separate Patrol.
This infographic helps demonstrate
Each Player Group can be affected by Areas of Influence independently. One Player Group being in an Area of Influence does not increase the Heat for any other Player Group. The modifiers for Outpost Destruction and Primary Objective completion are global and affect all Player Groups.
For example, let's consider a match with 2 players in it. If these players split up and Player 1 entered an Area of Influence but Player 2 did not, Player 1's Spawn Point bucket would increase at a faster rate than Player 2's.
The behavior of what happens when players split and rejoin repeatedly is very difficult to test and get clean results for. We are also unsure of the importance (if any) of Host vs Client.
Here is a video demonstrating this behavior [2]
What about the Unit Composition of Patrols?
Patrols have different "Templates" that they simply randomly choose from when created. We have not been able to identify any player actions that either increase or decrease the intensity or composition of a Patrol. Number of Players does affect the composition.
What are the effects of Player Death?
A player dying in and by itself appears to have no effect but spending a Reinforcement Point adds a random amount of Spawn Points to the current pool. We tested this extensively by spotting a freshly spawned patrol, immediately killing someone and then reinforcing them and timing how long it took for the next patrol to appear. There was no discernable pattern in our results. Sometimes it would result in a drastic reduction in time (upwards of 6x faster) and sometimes it seemed to have almost no effect at all.
Our main takeaway here is that Reinforcing dead players can drastically speed up the next Patrol Spawn. We have no way to identify if spending more reinforcement points within a single spawn cycle has any effect given the random nature of it.
We never observed the next spawn being slower than expected, it was either faster or on time.
What are the effects of Bot Drops/Breaches?
It appears that triggering a Bot Drop/Breach can introduce a short delay before the spawning of the next patrol. This delay only occurs if you're close to the next patrol spawning.
Specifics and Examples
The longest amount of delay that can occur is ~1/6th of the Baseline value and this only occurs if you are in the last 5/6th of the current spawn cycle.
For example, if I engaged a freshly spawned Patrol and this patrol called for reinforcements, the next Patrol will spawn exactly on time as the call happened too early in the spawn cycle. Using our Baseline of 240 seconds per Patrol, if I engaged some units that call for reinforcements 195 seconds into the current spawn cycle (or 81.25%), it will have no effect on the timing of the current Patrol cycle. However, if I were to trigger a reinforcement call at 235 seconds, the current spawn cycle will get delayed by ~40 seconds. The timing of the next cycle is not affected and will arrive after 240 seconds barring any other factors.
What is the impact of Time?
Verifying whether or not Time in and by itself had an impact on Spawn Rates was the first thing we did as we would need to account for it going forward. As we discovered each new mechanic, we then retested that mechanic against Time to see if it was affected. We discovered that Time has no impact on anything related to Patrols.
Does it impact the Baseline? No
Does it impact Heat generation or Areas of Influence? No
Does it change the impact of completing the Primary Objective? No
Does it alter the intensity or composition of Patrols? Not that we can tell but this one is difficult to lock down due to Patrol composition being randomized.
This video shows a Baseline Test and also demonstrates that Time has no impact [3]
How do these all systems interact and combine with each other?
The following factors combine in a multiplicative fashion:
- Primary Objective Completion
- Area of Influence Heat
- Outpost Destruction's effect
Some examples:
- If a solo player was in a Level 4 Automaton Mission, they have a Baseline time of 240 seconds.
- If they destroy all the Enemy Outposts, their baseline time shifts down to 204 seconds.
- If they then complete the Primary Objective, their baseline time shifts down to 56 seconds.
- If they then enter an Area of Influence at full strength (such as Extraction), they will receive a patrol every 37 seconds.
If a Duo was in a Level 4 Automaton Mission, they have a Baseline time of 200 seconds.
- They don't destroy over 50% of the enemy Outposts so there is no effect to their time from Outposts.
- If they complete the Primary Objective their baseline time shifts down to 55 seconds.
- If they then enter an Area of Influence at full strength (such as Extraction), they will receive a patrol every 36 seconds.
- If these players also destroyed 75% of the Outposts and were at Extraction, they will receive a patrol every 33 seconds.
If a solo player was in a Level 9 Automaton Mission, they have a Baseline time of 110 seconds.
- If they destroy all the Enemy Outposts, their baseline time shifts down to 93.5 seconds.
- If they then complete the Primary Objective, their baseline time shifts down to 25 seconds.
- If they then enter an Area of Influence at full strength (such as Extraction), they will receive a patrol every 17 seconds.
When we consider that these Patrol Spawns can be duplicated if Players are split into separate Player Groups, you can easily have an effective spawning speed that is less than 10 seconds.
When we also consider that even a single death can drastically shorten the time to the next patrol, it's easy to see how players get stuck in a "Death Spiral".
What is the impact of the "Localization Confusion" Booster?
As of 3/14/24, the Localization Confusion Booster has no effect on the Baseline times or any of the mechanics described. It appears to not have any effect on Patrols whatsoever.
Localization Confusion increases the time between calls for Reinforcements (Bot Drops/Breaches). It does not delay the time for a particular enemy to call, it just lengthens the time before another call can occur.
Rough Testing on this looks to be a ~10% increase but getting a clean stable baseline on this is difficult due to relying on AI behavior.
Final note regarding Population Cap
It is difficult to determine hard numbers on this but there does exist a global "Population Cap" that will prevent the spawning of additional Patrols. If too many enemy units are active in the world, no patrols will be created until some enemies are killed or despawned.
Show me the evidence
We understand that we're making some major claims about the game mechanics here so we made a video demonstrating the concepts in action.
Testing the various factors that alter the spawn rate [4]
Part 2
Where do Patrols spawn?
In Part 1, we know we made huge claims about the game mechanics and Luch's summary video contains our real-time manipulation of the system to produce predicated outcomes. Here is the demonstration u/Psyker101 (Luchs on Youtube) has put together a video summary for those that prefer a TLDR version. This video also contains our evidence and real-time demonstration of us actively manipulating the mechanics detailed below. [5]
Key Points
Each of the following topics will be detailed in its own section but here are the broad takeaways[6]
- Patrols will always attempt to spawn 125 meters away from their associated player
- Patrols will always be orientated towards an active enemy Outpost which is randomly selected among all active Outposts
- If no eligible Outposts remain Patrol spawns will be orientated towards the nearest Map Edge
- Patrols can be completely blocked from spawning in certain circumstances and the system can be manipulated to virtually guarantee Extractions without enemies
Player Safety Bubble
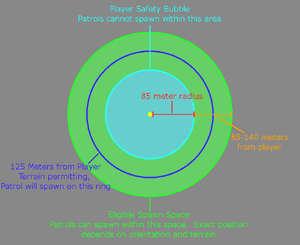
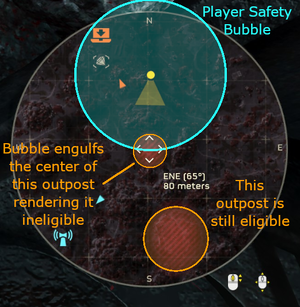
First we need to explain the concept of the “Player Safety Bubble”. Each player on the map generates an area around them which prevents a Patrol from being spawned within this area. The hard range of this bubble is around 85 meters meaning you are virtually guaranteed to not have a Patrol spawn within 85 meters of any player.
Patrols will attempt to spawn at exactly 125 meters from their associated player but this distance can have variance depending on terrain. You will almost always see spawns between 90-140 meters. We refer to this area as the "Eligible Spawn Space".
Prior to Patch 1.000.103, we believe that when a Patrol spawned it failed to account for the Safety Bubble of players other than the one it was associated with. This led to the infamous “Spawning on top of me” problem. Furthermore, it appears that the Safety Bubble range was substantially increased with Patch 1.000.103.
With Patch 1.000.103, all Player's Safety Bubbles are considered when attempting to spawn a Patrol. This new logic also allows players to "chain" their Safety Bubbles together.
What determines where a Patrol spawns?
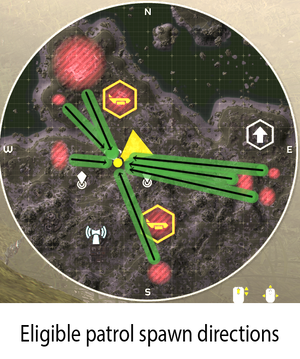
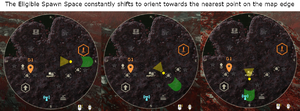
Patrols are always oriented towards an active enemy Outpost if possible and if that is not possible, they orient towards the nearest map edge. The size of the Outpost does not matter. Light, Medium, and Heavy can all be chosen to orient towards and there appears to be no “weight” associated with an Outpost’s size, they are treated as equal.
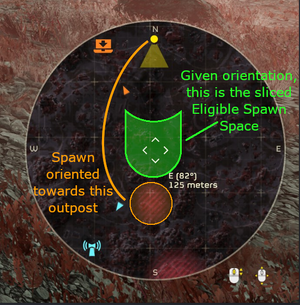
When a patrol spawns, it takes a slice out of the Eligible Spawn Space that is oriented towards the chosen Outpost or Map Edge. Then it attempts to find a valid spot exactly 125 meters from the player anywhere within that sliced Eligible Spawn Space. If a valid space doesn't exist at 125m, it shifts it around terrain until a space is found. This is why you sometimes get Patrols a bit closer or a bit further than 125m.
Which Outpost is chosen for a particular Patrol spawn appears to be entirely random. You could have multiple consecutive Patrols all orientated towards the same base or it could shift dramatically each cycle.
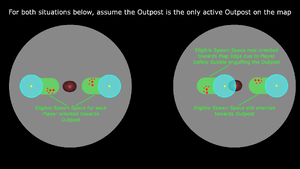
If a player is sufficiently close to an active Outpost such that their Safety Bubble overlaps the Base's center (Icon on the map), that Outpost is rendered ineligible for that Player Group until that player moves sufficiently far away again. In this event, a different outpost will be used for the Patrol’s spawning position or if no other Outposts exist, the nearest point on the map edge will be used.
If all the Outposts on a map are destroyed, Patrols will always spawn orientated towards the closest point on the map edge.
Spawn Blocking
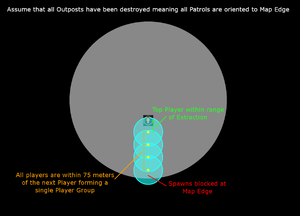
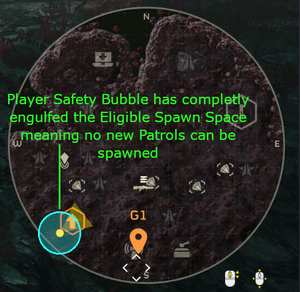
Once all Outposts have been destroyed the only eligible spawn space is the nearest point on the map edge. Players can leverage this situation by moving to 65 meters or closer to the map edge. Doing so causes the Map Edge Oriented Eligible Spawn Space to be fully engulfed by the Player’s Safety Bubble and no Patrols can spawn. So long as the player stays within 65 meters of the map edge, they can move anywhere around the map without any Patrols spawning.
This can also be leveraged during Extraction to completely block Patrols from spawning which means you have an Extraction with absolutely no enemies threatening you. Even with an Extraction that is somewhat far from the map edge, if you can stay within 75 meters of the next player in the Safety Bubble Chain, you can reach out to the map edge and block the spawns.
Edge Cases with Spawn Blocking
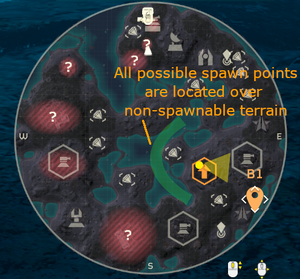
It is also possible to Spawn Block on certain maps without destroying all Outposts but it is extremely terrain dependent. Essentially, so long as the Eligible Spawn Space for enemies is entirely located in areas they aren’t allowed to spawn on, such as deep water, no enemies will spawn. The game does not fallback to Map Edge Oriented Spawning in this case, it just fails outright.
Actively manipulating the game state to achieve this is quite difficult but we want to call out that Spawn Blocking can occur without destroying all the Outposts or being near a Map Edge.
How does all of this work with Split Player Groups?
If players are split enough to form their own Player Group, each Player Group's Patrol will orient itself independent of other Player Groups. If one Player Group is in a position that blocks their Spawns or makes an Outpost ineligible, it does not prevent Spawn orientation for other Player Groups from that Outpost.
Notes
- All tests were performed on PC and we have no results or information regarding PS5 or PC to PS5 crossplay.
- 3/19 Update: Summary video put together by one of the testers (u/LexLocatelli)[7]
- Initial testing done on patch 1.000.101.
- 3/20 Update: Retested and confirmed behavior on patch 1.000.103, no changes occurred
- 4/2 Update: Retested and confirmed behavior on patch 1.000.200, no changes occurred
- Note from Authors: We hope that Arrowhead will approach this topic in a different way going forward as it is incredibly easy to Spawn Block right now and players can even experience it unintentionally. We are not spreading this information to encourage exploiting the mechanics, we are simply informing players about why things are happening. As part of this post, we are submitting an official bug report to Arrowhead along with our evidence so that they can address the issue. We all love Helldivers 2 and want to see it be as good a game as possible.
This page needs to be populated from these sources:
References
- ↑ https://www.reddit.com/r/Helldivers/comments/1bdudf3/lets_talk_about_patrols_an_in_depth_analysis_of/
- ↑ https://www.youtube.com/watch?v=7MFB-Cp_Joc
- ↑ https://www.youtube.com/watch?v=BD9Q0QWdSes
- ↑ https://www.youtube.com/watch?v=bEcPBW9EGg4
- ↑ https://www.youtube.com/watch?v=iFWIrA062Mk
- ↑ https://www.reddit.com/r/Helldivers/comments/1bsdy3u/lets_talk_about_patrols_part_2_an_in_depth/
- ↑ https://www.youtube.com/watch?v=Zp8xuf_dLDw
- ↑ https://www.destructoid.com/helldivers-2-theorists-dig-into-how-patrol-spawns-work/
- ↑ https://www.zleague.gg/theportal/helldivers-should-destroying-nests-and-fabricators-decrease-enemy-spawns/

