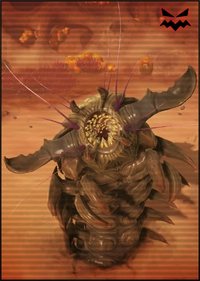
Helldivers 1:Hive Lord
The Bug Hive Lord is an enemy capable of creating new tunnels for the Bug hives and will, if left alone, perforate the entire crust of a planet with tunnels. As they are mostly underground, they are exceptionally hard to attack and get rid of. Therefore, any opportunity to assault a Hive Lord should not be squandered, and as they are extremely dangerous, bring the best you have when assaulting them.
| Role | Danger | Weapons | Resilience | Armor | |
|---|---|---|---|---|---|
| Master | Extreme | Poison | Extreme | Medium |
| Health | Constitution | Armor | ||||
|---|---|---|---|---|---|---|
| Base | Decay | Base | Decay | Location | Min | Max |
| 250000 | 0 | 0 | 3 | default | 30 | 175 |
| back | 300 | 400 | ||||
| Attacks | Projectile
Power |
Crit | Explosion
Type |
Explosion
Radius |
Explosion
Damage |
Ignore
Armor? |
Ignore
Shields? |
AP? | Effects |
|---|---|---|---|---|---|---|---|---|---|
| Claw | n/a | n/a | Direct | 2.0 | 2000 | yes | yes | no | none |
| Anti-Personnel | 2.0 | 100 | |||||||
| Unburrow | n/a | n/a | Direct | 2.0 | 4000 | yes | yes | no | none |
| Anti-Personnel | 2.0 | 100 | |||||||
| Charge | n/a | n/a | Direct | 2.0 | 600 | no | no | no | none |
| Anti-Personnel | 2.0 | 600 | |||||||
| Poison Booger | n/a | n/a | Direct | 3.0 | 35 (tic) | no | no | no | Slow
Poison |
| Anti-Personnel | 3.0 | 35 (tic) | |||||||
| Poison Circle | n/a | n/a | Direct | 10 | 0 | no | no | n/a | Heavy Slow
Medium Poison |
| Anti-Personnel | 10 | 0 |
Tactics
- The Hive Lord is found on special, outlying planets which players can only access after accumulating 50 points of influence against the Bug faction. The mission terrain can be any of the four normal environments (desert, forest, snow or volcanic) on a large square map, however, only missions on snow retain their environmental hazard. If players choose a dropzone suitably far from the enemy then they will have all the time necessary to call down any Stratagems, with the Hive Lord only spawning once Helldivers are nearby.
- Hive Lords are initially supported by several Elites which continually spawn from the edge of the battlefield. As the Hive Lord's health is depleted some Elites are replaced by Stalkers, then Brood Commanders and finally Impalers - with the climax of the battle featuring just the latter two enemy types supporting the Hive Lord.
Notes
Each enemy Master is randomly named by combining a name and a title.
| Name | Title | |
|---|---|---|
| Neptunea | Venericardia | the Burrower |
| Viviparus | Calyptraphorus | the Poisonous |
| Inoceramus | Tropites | the Monstrous |
| Monotis | Pecten | the Tunneler |
| Palmatolepsis | Perisphinctes | the Grub |
| Tetragraptus | Dictyoclostus | the Old One Eye |
| Paradoxides | Mucrospirifer | |
| Enemies | |
|---|---|
Bugs |
Scout – Vanguard – Shadow – Stalker – Warrior – Elite – Brood Commander – Impaler – Tank – Behemoth – Hive Lord |
Illuminate |
Observer – Watcher – Obsidian Observer – Hunter – Tripod – Strider – Apprentice – Outcast – Obelisk – Illusionist – Council Member – Great Eye |
Cyborgs |
Initiate – 'Squadleader' Soldier – Legionnaire – Hound – Grotesque – Immolator – Comrade – Berserker – Butcher – Hulk – Warlord – Infantry Fighting Vehicle – Siege Mech |

